IDWise Smart Onboarding SDK for iOS - Advanced Dynamic Journey Mode
Table of contents
- IDWise Smart Onboarding SDK for iOS - Advanced Dynamic Journey Mode
This document explains how to set up and start using IDWise SDK in Dynamic Journey mode. Alternatively, if you want to use Simple Journey mode which would get you up and running quicker and with less code if you do not need advanced control over the journey please check Simple Journey Mode here
Not Already a Customer?
Xcode Supported Version
IDWise SDK always supports latest Xcode version only. The current latest release of IDWise SDK supports below Xcode versions.
| Xcode | SDK |
|---|---|
| 14.3 | 4.1.6 |
Dynamic Journey Mode
In dynamic journey mode, IDWise provides full control to the hosting application to show its own UI and handle journey and step events more flexibly. This makes IDWise journey more configurable for the hosting application to not only show its own UI, control when to start each step and in what order and subscribe to events for progress of each step. Here is how you can setup and start using IDWise SDK.
Example Sequence Diagram

Requirements
The minimum deployment target for IDWiseSDK is iOS 12.0. In order to use the SDK your application minimum deployment target should be iOS 12.0 or higher. On your development machine you need to have XCode and CocoaPods installed. Both Intel and M1 (Apple Sillicon) based machines are supported. When working with Cocoapods you might have to run some commands through Rosetta Stone compatibility mode.
Installation
IDWise iOS SDK comes in three variants for different use cases to ensure you only use what you need and keep your app size manageable.
You can have a look at the example Podfile provided in the example project’s podfile which shows how to use the standard variant.
Standard SDK
Standard IDWise SDK is available to install via CocoaPods package manager from IDWise private Cocoapods repository. To add IDWise SDK to your project, first ensure you have these two lines at the top of your Podfile file:
source 'https://cdn.cocoapods.org/'
source 'https://github.com/idwise/ios-sdk'
This adds IDWise private Cocoapods repository as a source to install packages from
Next add this line also to your Podfile but this time underneath your target node for your project:
pod 'IDWise'
Also, add this configuration underneath your target node for your project:
  post_install do |installer|
    installer.pods_project.build_configurations.each do |config|
      config.build_settings['CODE_SIGNING_ALLOWED'] = 'NO'
      config.build_settings["EXCLUDED_ARCHS[sdk=iphonesimulator*]"] = "arm64"

    end
  end
After adding our dependency in your Podfile run:
pod install
Light-weight SDK
Light-weight IDWise SDK is available to install via CocoaPods package manager from IDWiseLight private Cocoapods repository. To add IDWiseLight SDK to your project, first ensure you have these two lines at the top of your Podfile file:
source 'https://cdn.cocoapods.org/'
source 'https://github.com/idwise/ios-sdk-light'
This adds IDWiseLight private Cocoapods repository as a source to install packages from
Next add this line also to your Podfile but this time underneath your target node for your project:
pod 'IDWiseLight'
Also, add this configuration underneath your target node for your project:
  post_install do |installer|
    installer.pods_project.build_configurations.each do |config|
      config.build_settings['CODE_SIGNING_ALLOWED'] = 'NO'
      config.build_settings["EXCLUDED_ARCHS[sdk=iphonesimulator*]"] = "arm64"

    end
  end
After adding our dependency in your Podfile run:
pod install
NFC SDK
IDWise SDK with NFC support is available to install via CocoaPods package manager from IDWiseNFC private Cocoapods repository. To add IDWiseNFC SDK to your project, first ensure you have these two lines at the top of your Podfile file:
source 'https://cdn.cocoapods.org/'
source 'https://github.com/idwise/ios-sdk-nfc'
This adds IDWiseNFC private Cocoapods repository as a source to install packages from
Next add this line also to your Podfile but this time underneath your target node for your project:
pod 'IDWiseNFC'
Also, add this configuration underneath your target node for your project:
  post_install do |installer|
    installer.pods_project.build_configurations.each do |config|
      config.build_settings['CODE_SIGNING_ALLOWED'] = 'NO'
      config.build_settings["EXCLUDED_ARCHS[sdk=iphonesimulator*]"] = "arm64"

    end
  end
After adding our dependency in your Podfile run:
pod install
Modular Approach ( Local Development Pods)
If you’re using modular approach and want to use IDWise SDK inside your local development pod only, then you need to do add following configuration to your local pod’s podspec file.
spec.xcconfig = { 'USER_HEADER_SEARCH_PATHS' => '$(inherited) "${PODS_CONFIGURATION_BUILD_DIR}/ExampleModule/ExampleModule.framework/Headers" "${PODS_CONFIGURATION_BUILD_DIR}/GTMSessionFetcher/GTMSessionFetcher.framework/Headers" "${PODS_CONFIGURATION_BUILD_DIR}/GoogleDataTransport/GoogleDataTransport.framework/Headers" "${PODS_CONFIGURATION_BUILD_DIR}/GoogleToolboxForMac/GoogleToolboxForMac.framework/Headers" "${PODS_CONFIGURATION_BUILD_DIR}/GoogleUtilities/GoogleUtilities.framework/Headers" "${PODS_CONFIGURATION_BUILD_DIR}/GoogleUtilitiesComponents/GoogleUtilitiesComponents.framework/Headers" "${PODS_CONFIGURATION_BUILD_DIR}/PromisesObjC/FBLPromises.framework/Headers" "${PODS_CONFIGURATION_BUILD_DIR}/Protobuf/Protobuf.framework/Headers" "${PODS_CONFIGURATION_BUILD_DIR}/nanopb/nanopb.framework/Headers" "${PODS_ROOT}/Headers/Public" "${PODS_ROOT}/Headers/Public/GoogleMLKit" $(inherited) ${PODS_ROOT}/GoogleMLKit/MLKitCore/Sources' }
Permissions for NFC SDK
You need to do some configurations for NFC to be enabled correctly. Following are the steps to do these configurations:
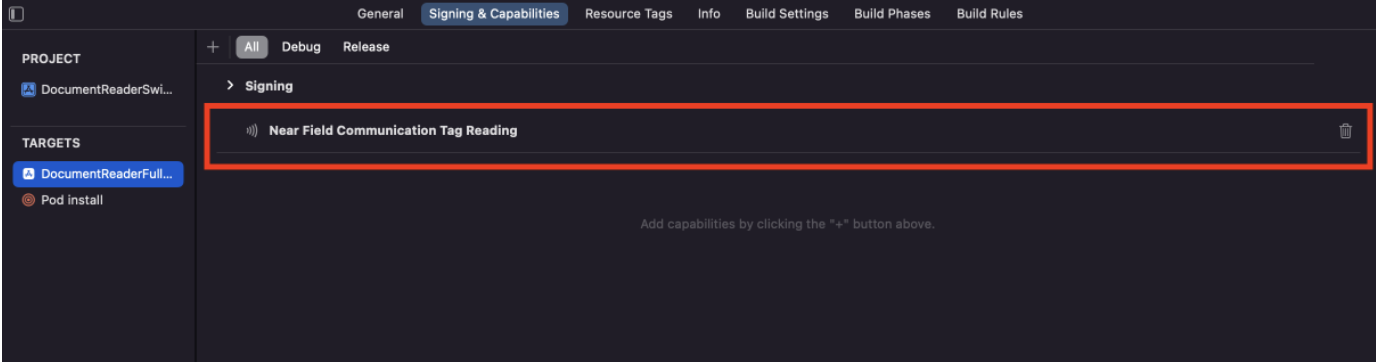
Add Near Field Communication Tag Reading under the Capabilities tab for the project’s target:
Add the NFCReaderUsageDescription permission to your Info.plist file - it’s needed to access the NFC hardware:
 <key>NFCReaderUsageDescription</key>
 <string>NFC tag to read NDEF messages</string>
Declare com.apple.developer.nfc.readersession.iso7816.select-identifiers a list of application identifiers that the app must be able to read according to ISO7816:
 <key>com.apple.developer.nfc.readersession.iso7816.select-identifiers</key>
 <array>
    <string>A0000002471001</string>
    <string>E80704007F00070302</string>
    <string>A000000167455349474E</string>
    <string>A0000002480100</string>
    <string>A0000002480200</string>
    <string>A0000002480300</string>
    <string>A00000045645444C2D3031</string>
</array>
Import IDWise SDK
Standard SDK
If you are using standard IDWise SDK variant, import IDWise package in your code file:
import IDWise
Light-weight SDK
If you are using Light-weight IDWise SDK variant, import IDWise package in your code file:
import IDWiseLight
NFC SDK
If you are using NFC IDWise SDK variant, import IDWise package in your code file:
import IDWiseNFC
Note: NFC ePassport and eID reading is an addon feature that needs to be enabled on your account to be usable. Please reach out to IDWise support to be enabled on your account.
Performing Verification Journeys
The rest of this document explains how to set up and start using IDWise SDK in Dynamic Journey mode. Alternatively, if you want to use Simple Journey mode which would get you up and running quicker and with less code if you do not need advanced control over the journey please check Simple Journey Mode here
Starting a dynamic user journey
IDWise SDK is designed to start on top of a UIViewController in your application. Each user onboarding or verification transaction is named a user journey.
To start a new dynamic journey just provide the UIViewController from which you want the flow to start then call IDWise.initialize method first with your provided client key and then you can call IDWise.startDynamicJourney method. If initialization is failed for any reason, you will get an error object with a code and a message explaining the reason of the error. In the following example, we called initialize method and then called startJourney method.
The IDWiseSDK.initialize method accepts clientKey and theme as It’s parameters.The theme parameter is for specifying the theme (dark or light). If you want the SDK to be in the same theme mode as set in system display settings, you need to pass IDWiseSDKTheme.systemDefault. However, if the OS is in dark mode and you want the SDK to be in light mode (or vice versa), you can pass the appropriate value for the theme parameter.
Possible values for the theme parameter include IDWiseSDKTheme.light,IDWiseSDKTheme.dard and IDWiseSDKTheme.systemDefault.
IDWiseSDKTheme.light // to specify light theme mode for SDK
IDWiseSDKTheme.dark // to specify dark theme mode for SDK
IDWiseSDKTheme.systemDefault // to specify the same theme as of operating system
        IDWise.initialize(clientKey: "<YOUR_CLIENT_KEY>",theme: .systemDefault) { error in
                // Deal with error here
                print(error?.message)
        }

        IDWise.startDynamicJourney(journeyDefinitionId: "<YOUR_CUSTOMER_ID>", referenceNumber: "<YOUR_REFERENCE_NO>", locale: "en", journeyDelegate: self, stepDelegate: self)
This will make IDWise SDK start a journey and make it the current journey. You can next start steps of this journey and guide the user through completing the necessary steps in the desired order.
This method takes following parameters:
journeyDefinitionId: Specifies the journey definition (aka template) to base this new journey on. Journey definitions are created based on your requirements and specify what documents and biometrics to collect from the user and in what order. JourneyDefinitionId is shared with you by IDWise team as part of your use-case and requirements discussions.referenceNo: A custom identifier to associate with this journey to enable you to link it back easily or associate it with a user on your system.locale(Optional) : Language code of the language to be used to display the journey user interface. This is either an ISO 639-1 (2-letter for example en) or IETF BCP 47 (2-letter plus extended language specified for example zh-HK or zh-CN)journeyDelegate: This parameter is used to provide a set of event handlers to handle the different events that are triggered from IDWise SDK. These events indicate the lifetime of a journey and provide oppurtunity for your application to react to certain journey events.stepDelegate: This parameter is used to provide a set of event handlers to handle the different events that are triggered from IDWise SDK. These events indicate the lifetime of a verification step and provide oppurtunity for your application to react to certain step events.
Resuming an existing journey
You can resume the exiting, incompleted journey at any time. Following is the sample to Resume an existing journey.
IDWise.resumeDynamicJourney(journeyDefinitionId: "<YOUR_CUSTOMER_ID>",journeyId: "<JOURNEY_ID>",locale: "en", journeyDelegate: self, stepDelegate: self)
This method takes following parameters:
journeyDefinitionId: Specifies the journey definition (aka template) to base this new journey on. Journey definitions are created based on your requirements and specify what documents and biometrics to collect from the user and in what order. JourneyDefinitionId is shared with you by IDWise team as part of your use-case and requirements discussions.journeyId: journeyId of the journey you want to resume. which you got in onJourneyStarted callback when you started the journey first time.locale(Optional) : Language code of the language to be used to display the journey user interface. This is either an ISO 639-1 (2-letter for example en) or IETF BCP 47 (2-letter plus extended language specified for example zh-HK or zh-CN)journeyDelegate: This parameter is used to provide a set of event handlers to handle the different events that are triggered from IDWise SDK. These events indicate the lifetime of a journey and provide oppurtunity for your application to react to certain journey events.stepDelegate: This parameter is used to provide a set of event handlers to handle the different events that are triggered from IDWise SDK. These events indicate the lifetime of a verification step and provide oppurtunity for your application to react to certain step events.
For example we can implement the protocol ‘IDWiseSDKJourneyDelegate’ as an extension on the ViewController like so:
extension ViewController:IDWiseSDKJourneyDelegate {
    func JourneyStarted(journeyID: String) {

    }

    func JourneyCancelled() {

    }

    func onJourneyResumed(journeyID: String) {

    }

    func JourneyFinished() {

    }

    func onError(error: IDWiseSDKError) {

    }
}
- JourneyStarted: Triggered when the journey is started and the Journey ID is assigned.
- JourneyFinished: Triggered when the journey is completed by the user.
- JourneyCancelled: Triggered when the user cancels the journey and doesn’t finish it.
- onJourneyResumed: Triggered when an existing journey is resumed.
- onError: Triggered when an error occurs for example a network connectivity error and lack of permission to access the camera.
When the journey is started it is assigned a unique id called Journey ID in IDWise system and this is provided as a parameter, journeyID with the triggering of JourneyStarted event. We can use this journeyID when we need to resume the journey. This identifier can be used to fetch the data and status of the journey from IDWise Journey Fetch API at any time.
Starting Journey Steps
After calling startJourney method and subsequently when JourneyStarted method is triggered successfully, you can call the IDWise.startStep method.
IDWise.startStep(stepId: String)
IDWise.startStep method takes the following parameter:
stepId: ID of the step you want to start. (Will be provided by IDWise for each step)
You can also pass a PDF or an Image as Data and for that you can use following method named startStepFromFileUpload. Important Note: Size of the Data should be less then or equal to 4Mb. Following is an example
IDWise.startStepFromFileUpload(stepId: String, data: Data)
IDWise.startStepFromFileUpload method takes the following parameter:
stepId: ID of the step you want to start. (Will be provided by IDWise for each step)
data: Data representation of an image file or a PDF file ( Data bytes must be less than or equal to 4Mb )
The methods in IDWiseStepDelegate will be triggered as step is handled and processed
We can implement the protocol IDWiseSDKStepDelegate as an extension on the ViewController same way as above to recieve the step events:
extension ViewController:IDWiseSDKStepDelegate {

    // This method will be triggered when user has captured the image/selfie from the camera
    func onStepCaptured(stepId: Int, capturedImage: UIImage) {
        // An example of showing custom UI
        LoadingView.show()
    }

    //This method will be triggered when Image processing is completed at the backend.
    //stepId will be the Id of the step that is just completed
    func onStepResult(stepId: Int,stepResult: StepResult?) {
        // An example of showing custom UI
        LoadingView.hide()
        if let result = stepResult {
          print(result.document?.documentType)
        }
    }

}
onStepCaptured: This handler will be triggered when user has captured the document or selfie. Control will be returned to your application by this point and you can show any UI or run business logic to guide the user through the rest of the journey. At this point the captured image will have started uploading to backend in the background but would have not finished processingonStepResult: This handler will be triggered when step has finished processing. stepResult will contain information about the corresponding step. Your application can show any UI or can perform any business logic in this method
From stepResult variable in onStepResult(...) callback, you can receive the extracted fields. And if the validation is failed, you can get the failure code as stepResult.failureReasonCode
StepResult contains following information
public struct StepResult {

    // error code for specific errors
    public let errorUserFeedbackCode: String?

    //Detailed error description
    public let errorUserFeedbackDetails: String?

    //Short message for error
    public let errorUserFeedbackTitle: String?

    //The image has passed all rules
    public let hasPassedRules: Bool?

    //processig has been completed or not
    public let isConcluded: Bool?

    //Processing status one of (In Progress, Submitted, Not Submitted)
    public let status: String?

    //Map of extracted fields from the document
    public var extractedFields = [String:FieldValue]()

    // result from NFC Scanning
    public var nfcResult: NFCResult?

    // Recognized Document Fields
    public var recognition: DocumentRecognition?

}
The NFCResult object contains the following data extracted from the Document via reading the NFC chip
public struct NFCResult {

    // photo of the user which is extracted from NFC Chip
    public let facePhoto: UIImage?

    // Map of the extracted data from the NFC chip during scanning
    public var extractedFields: [String:FieldValue]? = nil
}
The DocumentRecognition object contains the following properties
public struct DocumentRecognition: Decodable {

    // Document type
    public let document_type:String?

    // Document Issuing country code
    public let issuing_country_code:String?

    // Document Issuing country name
    public let issuing_country_name:String?
}
Where FieldValue holds the value of the extracted field.
public struct FieldValue {
    public let value: String?
}
Note: NFC ePassport and eID reading is an addon feature that needs to be enabled on your account to be usable. Please reach out to IDWise support to be enabled on your account. You will also need to ensure that you use the IDWise NFC SDK variant instead of the standard SDK variant.
Finishing the Journey
You need to call this IDWise.finishDynamicJourney(journeyId: String) method to mark the journey complete. This method takes one input parameter named journeyId. The method will throw error through onError(error: IDWiseSDKError) in case of anything goes wrong or invalid journeyId is provided.
journeyId: journeyId of the journey that needs to be mark finished.
Getting the Journey Summary
You can call this IDWise.getJourneySummary(journeyId: String, callback: @escaping ((JourneySummary?,IDWiseSDKError?)->())) method anytime to get status of your journey passing the journeyId to this method. You will receive a callback with JourneySummary or an IDWiseSDKError in case anything fails at server side or in authentication.
journeyId: JourneyId against which you need journey summary.
JourneySummary: This is the JourneySummary object and It’s structure is as follow:
public struct JourneySummary: Decodable {
    public let journeyId: String
    public let isCompleted: Bool
    public let stepSummaries: [StepSummary]

    public struct StepSummary: Decodable {
        public let definition: StepDefinition
        public let result: StepStatus?
    }

    public struct StepDefinition: Decodable {
        public let stepId: Int
    }

    public struct StepStatus: Decodable {
        public let hasPassedRules: Bool?
        public let isConcluded: Bool?
        public let status: String?
        public let errorUserFeedbackCode: String?
        public let errorUserFeedbackTitle: String?
        public let errorUserFeedbackDetails: String?

    }
}
Error Codes
| Error Code | Error Description |
|---|---|
| 11 | Invalid/Empty Parameter (Client key is empty or Invalid) |
| 22 | SDK is not initialized. Please Call IDWise.initialize(:) first |
| 33 | Wrong API credentials (Client Key) provided |
| 44 | Empty journeyId is provided to resume journey. |
| 45 | Provided file size is exceeding the maximum file size |
| 66 | No step found against provided stepId to start. |
| 70 | Invalid step Id provided, please provide a valid stepId. |
| -101 | An unexpected error occurred while processing the request.Make sure you have Internet connected |
| -102 | Network seems to be not connected, Please try again with network connected. |
| 55 | This method is not supported in this Journey Mode |
NFC Extracted Fields
| Field Name |
|---|
| Full Name |
| First Name |
| Last Name |
| Birth Date |
| Expiry Date |
| Issue Date |
| Document Number |
| Issuing Authority |
| Issuing Country |
| Issuing Country Code |
| Machine Readable Zone |
| Machine Readable Zone Type |
| Nationality |
| Nationality Code |
| Personal Number |
| Sex |
Keep in touch
Please get in touch if you want to make any adjustments or customisations to your users journey. Please feel free to jump on a chat by visiting our website: